Configuring a Remote Control for Kodi
Since the early days when people started to connect a PC to a TV, the question of "how do I control it?" has been asked. During that dark time, around 2002, many of us ran a set of extra long USB cables to a keyboard and mouse that sat on our coffee table. If you had a little more money, you had a wireless keyboard and mouse. Soon Microsoft released a version of Windows XP called the "Media Center Edition" that came with a remote control. While this was a step forward, this remote control required that you use Microsoft developed media programs. Configuring it to work with non-Microsoft programs such as Kodi was complicated and not always reliable. As these home-built Home Theater PC's became more popular, companies started to make a wireless mini keyboards with a laptop type track pad. While these worked great, it tended to be intimidating to use for non-computer users. Why? Too many buttons and it did not look like it belonged in the living room. In 2011, Motorola and Kodi, then known as XBMC, came up with a solution. A hybrid remote control/ keyboard that the user could just plug into their computer and control Kodi with no configuration needed.
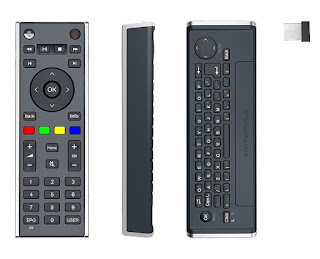
It looked and felt like a normal remote control, but it had a full keyboard on the back side. This started a revolution in "Ease of Use" for HTPC's, and made them more accessible to your average user. While this remote control is no longer available, its decedents are still going strong. Unfortunately, they require a little bit of customization to use them fully. Thankfully, this customization can be painlessly accomplished natively in Kodi using an add-on.
Choosing a Remote Control
Choosing a remote control that is right for you can be daunting. There are many remotes available that say they are "fully compatible" with Kodi, but are not. Most of these remotes are in the $10 to $15 range and are cheaply made. Because of a lack of quality control, they tend not to last for very long and sometimes not every function will work. I personally suggest spending a little more money and going with a name brand known for their HTPC remotes. The two most popular brands are Riitek and Minix.
The Riitek remote that I suggest is the Rii 25 series.
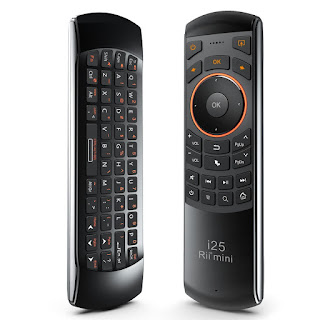
It is sleek looking, well made, has a built in rechargeable battery, and a keyboard on its reverse side. With a push of a button, it becomes an "Air Mouse". This allows you to control a mouse cursor by moving the remote. This is similar to using a Wii controller, but much more accurate. You can find the K25 version on Amazon here. It is also available on Aliexpress direct from the manufacturer here.
I personally use the Minix Neo A2 Lite.
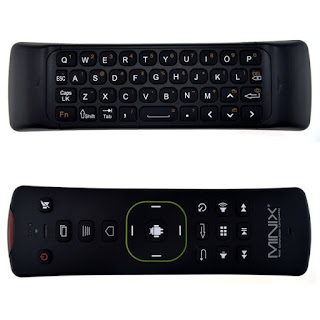
It fits my hand better, and I like feel of the buttons better than the offering by Rii. Like the Rii, it has a keyboard on one side and the "Air Mouse" function. Unlike the Rii, this remote uses 2 AAA batteries for power. You can find it on Amazon here. Like the Rii remote, it can be purchased direct from the manufacturer on Aliexpress here.
Both remotes are a great choice for an HTPC set-up. This guide will be using the Minix Neo A2 Lite in all of its examples. The setup is similar no matter which remote you use.
***Note for Linux Users***
In Ubuntu based distributions, there is a bug that prevents the remote's "Play/ Pause" button from working properly. The fix is to remove the default keyboard shortcuts for these functions.
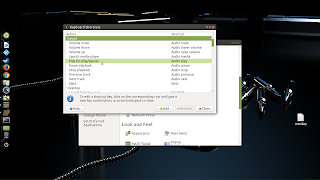
In Ubuntu Mate, open the "Control Center" and click on "Keyboard Shortcuts".
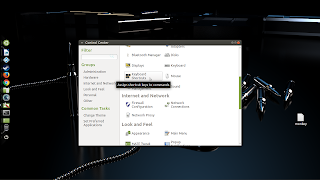
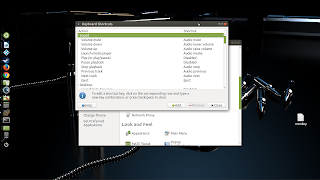
Highlight the "Play (or play/pause)" shortcut and hit backspace to delete it. You will also need to do this with the "Pause playback" shortcut as well.
Hit close and you are now ready to customize your remote.
Install the "Keymap Editor" Add-on
We will be configuring the remote control from within Kodi using an Add-on. This Add-on is called "Keymap Editor". To install it do the following:
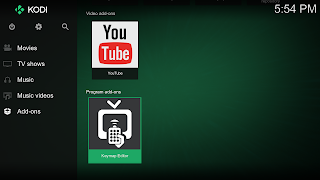
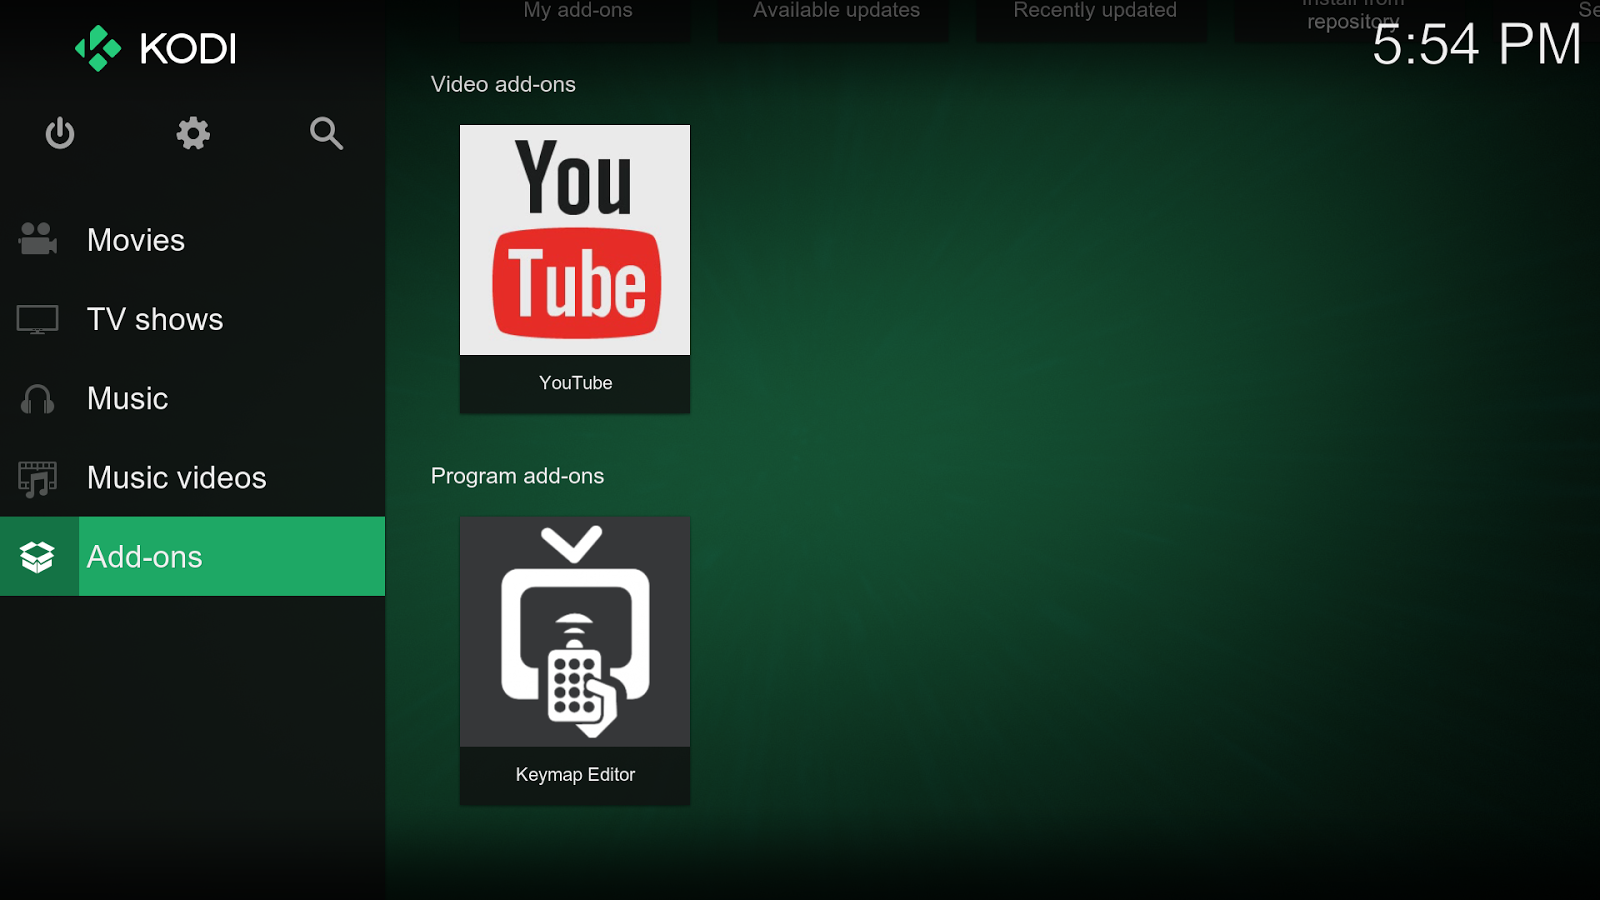
1. Go to you "Add-ons" section of Kodi's home screen.
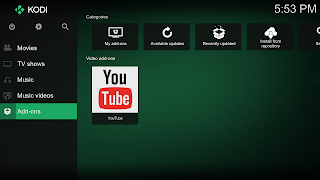
2. Select "Install from repository".
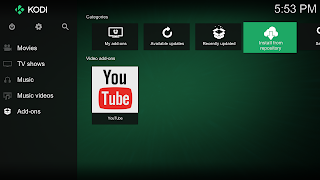
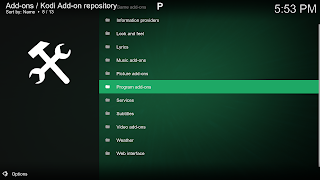
3. Choose the "Kodi Add-on repository".

4. Select "Program add-ons".
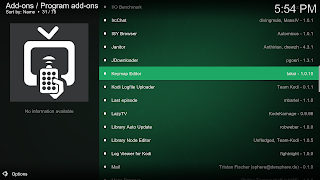
5. Scroll down and select "Keymap Editor".
6. Click on the "Install" button.
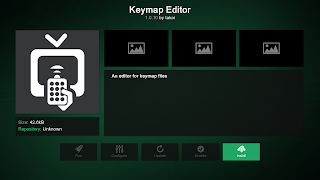
7. The Add-on is now installed and available in your "Add-ons" section of Kodi's home screen.
Configuring the Remote Control
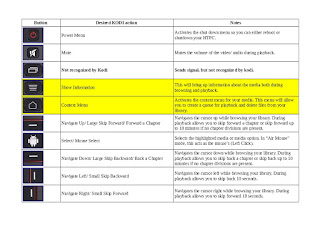
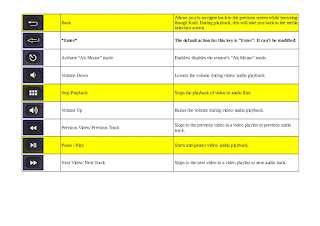
When you plug in the Minix Neo A2 remote, most functions will work right out of the box. To get full functionality, I changed some of the default functions on the remote. Below is a chart that shows my remote configuration and what each button does. The yellow highlights show which buttons I have changed the function of.
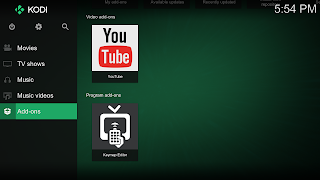
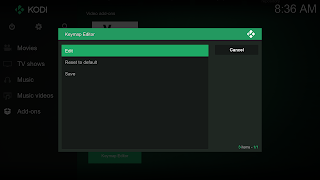
1. Go to the "Add-ons" section of Kodi's home screen and open the "Keymap Editor" plugin.
2. Select "Edit".
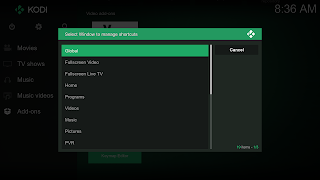
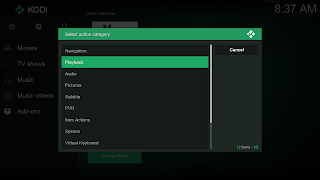
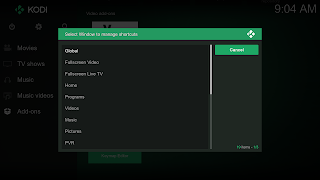
3. Select "Global".
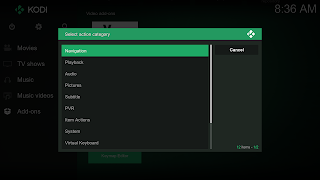
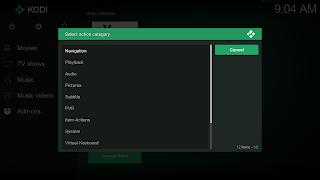
4. To configure the buttons I have chosen above for "Show Information", "Context Menu", and "Back", select the "Navigation" option.
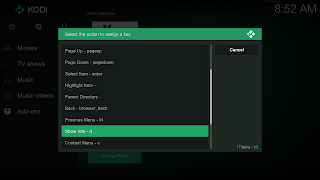
5. Scroll down to the "Show Information" option and click on it.
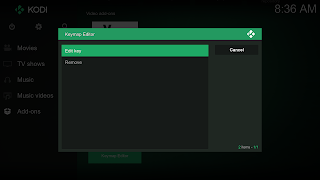
6. Select the "Edit key" option. This will bring up a dialog asking you to press the key you want to assign. When you see this dialog, press the key on the remote that you want to bind this function to.
7. Once you press the key you want to bind, you will be taken back to the "Navigation" screen. You will see that the "Show Information" option now has a number beside it. This number is what your Operating System uses to identify the key you pressed.

8. Do the same process for the "Context Menu" and the "Back" buttons.
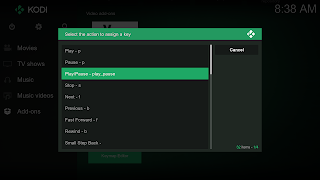
9. Now that you have the navigation buttons bound, you need to click "cancel" once to go back to the "Global" menu. Then click on the "Playback" option.
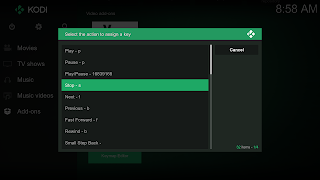
10. Scroll down to the "Play/pause" selection and change it to the button on the remote you want to use. The process is the same as steps 6 and 7, only you are in the "Playback" menu.
11. Do the same for the "Stop" button on your remote.
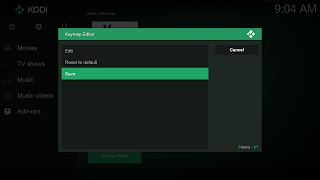
12. Now click on "Cancel" twice to get back to the "Keymap Editor's" main menu.
13. Select "Save" to save your key maps. Once you click on save, you will be taken back to Kodi's "Home Screen".
Your remote control is now configured to function like the above chart. You do not need to restart Kodi for your new key maps to take effect. However, it is a good idea to do so.
What is nice about this Kodi Add-on is that it generates a file for your keymaps. This file can be backed up. As long as you are using the same Operating System, this file can then be used to restore your key maps by placing the file in the required folder. The name of this file is "gen.xml". It is located in the following location:
By following the instructions in this post, you now have an HTPC that is not only easier to control, but is accessible to more users. In my mind, it gives your HTPC a touch of class. Thank you again for reading this post. Please feel free to comment below about it. Also, feel free to let me know if there are any topics you would like me to cover in the future.
Cheers!

It looked and felt like a normal remote control, but it had a full keyboard on the back side. This started a revolution in "Ease of Use" for HTPC's, and made them more accessible to your average user. While this remote control is no longer available, its decedents are still going strong. Unfortunately, they require a little bit of customization to use them fully. Thankfully, this customization can be painlessly accomplished natively in Kodi using an add-on.
Choosing a Remote Control
Choosing a remote control that is right for you can be daunting. There are many remotes available that say they are "fully compatible" with Kodi, but are not. Most of these remotes are in the $10 to $15 range and are cheaply made. Because of a lack of quality control, they tend not to last for very long and sometimes not every function will work. I personally suggest spending a little more money and going with a name brand known for their HTPC remotes. The two most popular brands are Riitek and Minix.
The Riitek remote that I suggest is the Rii 25 series.

It is sleek looking, well made, has a built in rechargeable battery, and a keyboard on its reverse side. With a push of a button, it becomes an "Air Mouse". This allows you to control a mouse cursor by moving the remote. This is similar to using a Wii controller, but much more accurate. You can find the K25 version on Amazon here. It is also available on Aliexpress direct from the manufacturer here.
I personally use the Minix Neo A2 Lite.

It fits my hand better, and I like feel of the buttons better than the offering by Rii. Like the Rii, it has a keyboard on one side and the "Air Mouse" function. Unlike the Rii, this remote uses 2 AAA batteries for power. You can find it on Amazon here. Like the Rii remote, it can be purchased direct from the manufacturer on Aliexpress here.
Both remotes are a great choice for an HTPC set-up. This guide will be using the Minix Neo A2 Lite in all of its examples. The setup is similar no matter which remote you use.
***Note for Linux Users***
In Ubuntu based distributions, there is a bug that prevents the remote's "Play/ Pause" button from working properly. The fix is to remove the default keyboard shortcuts for these functions.
In Ubuntu Mate, open the "Control Center" and click on "Keyboard Shortcuts".

Highlight the "Play (or play/pause)" shortcut and hit backspace to delete it. You will also need to do this with the "Pause playback" shortcut as well.

Hit close and you are now ready to customize your remote.

Install the "Keymap Editor" Add-on
We will be configuring the remote control from within Kodi using an Add-on. This Add-on is called "Keymap Editor". To install it do the following:
1. Go to you "Add-ons" section of Kodi's home screen.

2. Select "Install from repository".

3. Choose the "Kodi Add-on repository".

4. Select "Program add-ons".

5. Scroll down and select "Keymap Editor".

6. Click on the "Install" button.

7. The Add-on is now installed and available in your "Add-ons" section of Kodi's home screen.
Configuring the Remote Control
When you plug in the Minix Neo A2 remote, most functions will work right out of the box. To get full functionality, I changed some of the default functions on the remote. Below is a chart that shows my remote configuration and what each button does. The yellow highlights show which buttons I have changed the function of.


1. Go to the "Add-ons" section of Kodi's home screen and open the "Keymap Editor" plugin.

2. Select "Edit".

3. Select "Global".

4. To configure the buttons I have chosen above for "Show Information", "Context Menu", and "Back", select the "Navigation" option.

5. Scroll down to the "Show Information" option and click on it.

6. Select the "Edit key" option. This will bring up a dialog asking you to press the key you want to assign. When you see this dialog, press the key on the remote that you want to bind this function to.

7. Once you press the key you want to bind, you will be taken back to the "Navigation" screen. You will see that the "Show Information" option now has a number beside it. This number is what your Operating System uses to identify the key you pressed.

8. Do the same process for the "Context Menu" and the "Back" buttons.
9. Now that you have the navigation buttons bound, you need to click "cancel" once to go back to the "Global" menu. Then click on the "Playback" option.

10. Scroll down to the "Play/pause" selection and change it to the button on the remote you want to use. The process is the same as steps 6 and 7, only you are in the "Playback" menu.

11. Do the same for the "Stop" button on your remote.

12. Now click on "Cancel" twice to get back to the "Keymap Editor's" main menu.


13. Select "Save" to save your key maps. Once you click on save, you will be taken back to Kodi's "Home Screen".

Your remote control is now configured to function like the above chart. You do not need to restart Kodi for your new key maps to take effect. However, it is a good idea to do so.
What is nice about this Kodi Add-on is that it generates a file for your keymaps. This file can be backed up. As long as you are using the same Operating System, this file can then be used to restore your key maps by placing the file in the required folder. The name of this file is "gen.xml". It is located in the following location:
Windows: %APPDATA%\kodi\userdata\keymaps

Linux: ~/.kodi/userdata/keymaps

Android: /sdcard/Android/data/org.xbmc.kodi/files/.kodi/userdata/keymaps
By following the instructions in this post, you now have an HTPC that is not only easier to control, but is accessible to more users. In my mind, it gives your HTPC a touch of class. Thank you again for reading this post. Please feel free to comment below about it. Also, feel free to let me know if there are any topics you would like me to cover in the future.
Cheers!


KODI Alternatives
ReplyDeleteInteresting article. Thank you for sharing.
DeleteConfiguring A Remote Control For Kodi >>>>> Download Now
Delete>>>>> Download Full
Configuring A Remote Control For Kodi >>>>> Download LINK
>>>>> Download Now
Configuring A Remote Control For Kodi >>>>> Download Full
>>>>> Download LINK 3y
I gotta most loved this site it appears to be exceptionally useful . download kodi for android
ReplyDeleteI definitely enjoying every little bit of it and I have you bookmarked to check out new stuff you post. remote control computer
ReplyDeleteIts always a good idea to use a VPN with Kodi such as Ivacy VPN for unblocking content and evading geo restrictions.
ReplyDelete