Posts

Stereo Pi - An Experiment in DIY Stereo System - Part 2

Image
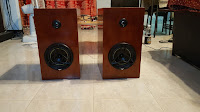
Greetings from the Nut Hutch. Thailand is in the middle of their Songkran celebrations and it is very hot outside. So I thought today would be a good day to take a break from the heat and celebrations to finish discussing my Stereo Pi project. In my previous post, link , I listed the parts I used in this project. Now it is time to put them all together to make a working system. Speakers Because they were the first component that I had all the parts for, the first thing I assembled were the speakers. As stated before, the speakers I used were originally designed for use with a car stereo. In order to use them properly with a home stereo, some special care had to be taken in their construction. The first has to do with the size of the speaker box. If the box is too large, the low frequencies produced by the speakers will not be heard. On the flip side, if the box is too small, the lows produced will be muddled. I decided to use a very unscientific method to figure out the size of bo

Stereo Pi - An Experiment in DIY Stereo System - Part One

Image
Greetings from the "Nut Hutch". Today we had an unusual event for this time of the year, it has been raining all day. I am so disappointed that I had to put my yard work on hold... not. Since I was stuck indoors, I decided it was time to talk about my "Stereo Pi" project. This project was born out of my disappointment with the sound quality of music out of my current multimedia setup, a Soundbar/ Sub-woofer combo. While it does a good job for movies and television programs, its music playback tends to be very muddy and distorted. This quest for better sound quality took me down a surprising path. Which turned out to be quite fun and a learning experience for me. Since this project is a long one, I am breaking it down into two posts. Today I will discuss the parts I purchased and next time I will discuss how I built it and the results. Ultimately I wanted something that I could play all of my digital music through. With this goal in mind, I came up with some requi

Manjaro Deepin Community Edition - Four Months Later Including Some Fixes and Customizations

Image
Hello again from the Nut Hutch. I must apologize for my lengthy absence. The reasons for this absence are why I call my domicile the "Nut Hutch". For example, in the last couple of months, I have started to learn to speak, read, and write Thai. Meanwhile, the wife started a new job that keeps her busy for a longer period of time. Then the pièce de résistance, the LCD Screen, keyboard, and the SSD in my laptop all decided to die in a cascade of failures that would have been funny if the repair parts were not so expensive. Because my laptop was never sold in Thailand, I had to import the LCD Screen and Keyboard from overseas. Finally, after a month and a half of waiting, the parts arrived and I was able to effect the needed repairs. Needless to say, the laptop is now back in fighting shape. Replacing the SSD in the laptop meant that I needed to reinstall Manjaro Deepin Community Edition (Manjaro Deepin CE). Since I regularly backup my home folder, I did not loose any data. Even

Manjaro and Deepin Desktop 15.5 - Elegance Redefined

Image
Greetings from the nut hutch that is my house here in Thailand. While Thailand doesn't celebrate Thanksgiving and Christmas like we do in the West, the Expat community here does. So I have been off visiting friends, doing some Christmas shopping, and picking up the latest cold that is going around some of the students I tutor. Next thing I know, it is the middle of December, and I have not put out a blog entry in a while. During my "break", I was issued a challenge by a fellow Expat. To install and use the Manjaro Deepin Community Edition for a month. Since I was impressed with Manjaro's implementation of the Gnome DE, link , I decided to take up that challenge. Overview Before I get too far into this post, an explanation needs to be given. There are two projects that use the Deepin name, and to make it even more confusing, they are developed and maintained by the same company, Wuhan Deepin Technology. They are responsible for not only the Deepin Desktop Environm

Nuke and Pave: Windows 10 Pro ver. 1709 - Aka The Fall Creators Update.

Image
Just a quick update. About 2 weeks ago, I had a new post almost ready to publish, and then I lost it all. You see, I write the texts of these posts off-line and then upload the text and add the pictures and links before I publish them. Just as I was about to do this, Windows 10 automatically updated itself to the new "Fall Creators Update". The number of problems created by this update, made my computer so unstable, that the only solution was to re-format my hard drive and re-install Windows. Luckily, about 95% of my data was backed up. Unfortunately, the text of my blog post was not among that data. Here are the problems I ran into with the latest and "greatest" to come out of Redmond. Problem - I was required to log into my computer two times. From my research, this was caused by the graphics card driver not talking to the Operating System (OS) properly. So I was logging into the OS with out the graphics card driver enabled the first time and then the OS with t

Setting up Plex to work with a Panasonic Viera HDTV and Kodi Comparisons

Image
Like many people I know, I have a television in my bedroom. In order to watch programs from my Media Server, I have an Android TV attached to it. After playing around with some of the options on the TV, I noticed that I had another option to stream content from my Media Server. Smart televisions from Panasonic and other manufacturers have the ability to stream media from servers that use the DLNA protocol. I was intrigued to see how this protocol worked. Since I needed some DLNA server software, it gave me an opportunity to try out Plex. Little did I know it at the time, but was I in for an interesting ride. Plex and the Panasonic Viera HDTV The first thing I needed to do was install the Plex Server software on my Media Server. This was accomplished quite easily on my Linux Mint 18.2 by using the provided deb file. It installed and configured itself without any noticeable hitches. Since at this point I was just experimenting, I added only one of my media hard drives to the server&#